What Is The Best Way To Sharpen A Snow Blower Auger?
Winter weather can be a lot of fun but creates much work. If you own a snow blower, you know all too well how essential it is to keep the machine up and to run! Maintaining the auger in good condition is a crucial feature that should be addressed.How can you ensure that your snow thrower’s auger is sharp?
With the right tools and steps, sharpening your snow blower’s auger doesn’t have to be daunting.
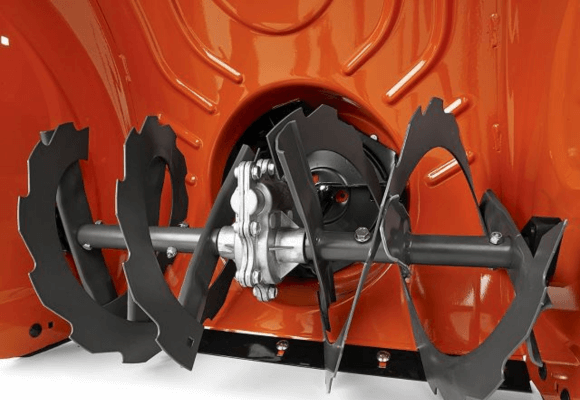
A snow blower auger is an invaluable tool for removing large amounts of snow quickly and efficiently.
However, over time the auger can become dull and ineffective. So how do you sharpen a snow blower auger? Let’s take a look.
How To Sharpen Snow Blower Auger?
Preparing your snow blower for the winter months requires maintenance, like sharpening your auger.
An auger that is not sharp enough can cause problems with the machine’s performance, so it is essential to give it a tune-up before the snow season kicks in.
Preparing Your Snow Blower for Sharpening
Before you start sharpening the auger of your snow blower, there are a few steps you need to take to prepare.
Ensure your snow blower is turned off and disconnected from the power source first. You should also wear protective gloves throughout this process as an extra precaution.
Finally, review the manual for your specific model to be aware of any special instructions or precautions for your machine.

Sharpening Your Auger
Once you have prepared your machine, it’s time to sharpen the auger itself. A rotary tool, such as a Dremel or similar device equipped with the proper cutting or grinding attachment bit, can be used for this.
The next step is to attach an angle grinder with a metal grinding disc. Hold the angle grinder against the blade at an upwards-facing angle and move it slowly across both sides of the blade. Be sure not to press too hard – just enough pressure so that the grind marks are deep and sharp.
- Start by slowly running this tool along each blade on both sides of the auger and removing any excess material that has built up over time.
- Repeat this process until each blade is smooth and even on both sides.
- Don’t forget to pay special attention to those blades near the center of the auger as they can often become duller than those along the outer edges due to extended use.
- Make sure not to apply too much pressure when grinding so that you don’t accidentally damage any of your blades!
Once you have finished sharpening all of the blades on both sides, give them one last look over before continuing with the reassembly.
Reassembling Your Snow Blower
Once you have successfully sharpened all of the blades of your auger, it’s time to put everything back together again! Begin by inserting each blade into its designated slot on either side of the auger.
Make sure they are securely fastened before moving on to reattaching any other parts that may have been removed during disassembly (e.g., screws).
If necessary, replace any worn-out parts with new ones before fully reassembling and reconnecting any cables or wires that were disconnected during disassembly (if applicable). Now you are ready for another season of reliable winter performance from your snow blower!
Conclusion:
Sharpening your snow blower’s auger isn’t always easy—but with these tips in mind, hopefully, it won’t be too difficult! Make sure to follow all safety precautions when handling power tools like files and stones so that no one ends up getting hurt in the process.
With regular maintenance and upkeep like this throughout wintertime months, your snow blower will stay running smoothly for many years to come!Why then are you still holding out? Sharpen those blades as soon as possible!

With 20 years of experience in tree work, I run my small business with a focus on safety and skill. My passion lies in the trees, where I find both joy and escape. Through my channel on SurferHandy, I share insights into safe and fun tree work, offering tips and techniques for both novices and professionals. Get More About me